
Flag animation in 3ds Max
Flex Modifier - Part2

Flex Modifier as discussed in the tutorial Flex Modifier in 3ds max - Part1 can be combined with Space warps and Deflectors in 3ds Max to simulate realistic animations and collisions. In this tutorial we will animate a flag using Wind Space warp with Flex Modifier. To get a basic idea of Flex modifier go through the part1 of this tutorial: Flex Modifier in 3ds max - Part1.
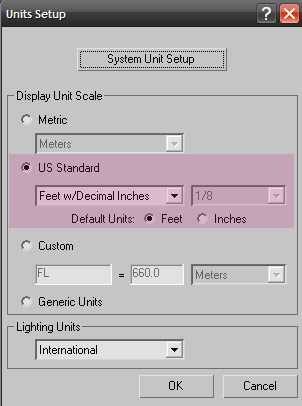
First let us set the max units to Meters.
From Customize menu select Units Setup (Customize -> Units Setup . refer image.)

use the following setting in Units Setup Dialog. (refer image)

The reason why we change the units to Meters is to give a real world behaviour of wind, because the default Generic unit of 3ds max will give us a jittery and erratic wind behaviour and it requires a lot of tweaking. Now lets us go into the tutorial.
1. Create a Plane in the front viewport of 3ds max with the following settings.

Also create a pole for flag. (use cylinder to create a pole. Refer image)

2. Create a Wind Space warp and place it as shown in the following image.


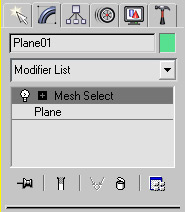
3. Select the Plane and add Mesh Select Modifier from the Modifier Panel.

4. From the Mesh Select Modifier, select Vertex Sub-object and select all the vertices except the first row that is near the flag pole. (Refer image)

5. Now with the vertices selected add a Flex Modifier to the plane. Refer image.

6. Now select the Flex modifier and under Forces and Deflectors click Add button under Forces and click on the Wind Space warp in viewport, this will add Wind to Forces.

7. Now expand the Flex Modifier and select Weights and Springs Subobject. Now the Vertices are shaded with different colors that shows the vertices influenced by flex modifier. Red vertices are under full effect of flex while Blue vertices are outside the area of influence.

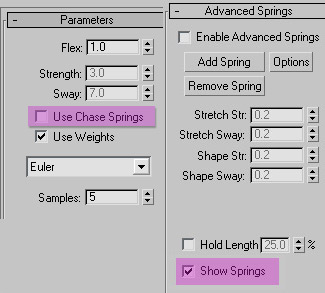
8. Now in the Flex Modifier panel go to Advanced Springs Rollout and select Show Springs.

9. Now the Plane must must be converted into a soft body that will react to the forces of Flex modifier coupled with wind. Under Simple soft Bodies rollout click on the button Create Simple Soft Body. (Refer Image).

10. Now goto Advanced springs rollout and uncheck the Show Springs option as well as goto Parameters rollout and uncheck Use Chase Springs.

11. Now before playing the animation lets tweak the values of Stretch and Stifness under Simple Soft Bodies rollout of Flex modifier as well as the Strength and Turbulence values of Wind. Use the values illustrated in the image.

12. Now animate the Wind by setting animation keys (use Auto Key) so that wind flows in different directions . Rotate around Z axis to change direction over time.
No Play the animation. You can also use Deflectors to avoid interpenetration of the soft body (Plane).
Download Flag animation 3ds max file.
[download id="16667"]


